The best product demo videos do not feel like marketing. They feel like a colleague showing you something that will save you time. The problem is that most teams cannot produce them fast enough to keep up with the product. By the time a demo ships, the UI has already changed.
AI fixes the speed problem, but only if you use it inside a disciplined workflow. Prompt-to-clip tools are fast, yet they hand you a frozen file that is expensive to update. The smarter path is to use AI for drafting, motion, and voice, while keeping the project editable so you can re-render when the product changes. (See how the pricing breaks down across production methods.)
This guide walks through that workflow from start to finish. It is written for SaaS founders, product marketers, and growth teams who need homepage demos, feature explainers, and tutorial libraries that stay current. Expect clear prompts, concrete settings, and a review process that catches the mistakes most AI-produced demos make.
Step 1: Decide what the demo must do
Before you open a tool, write a one-page brief. A fuzzy brief produces a fuzzy demo, and AI will only make the fuzziness arrive faster.
Answer six questions:
- Who is the viewer? Job title, current pain, and how familiar they are with your product.
- Where will they watch? Homepage, sales email, social feed, YouTube, or in-app.
- What is the one thing they should believe after watching?
- What is the one action they should take?
- How long should it be? 60-90 seconds for a homepage hero, 30-60 seconds for a feature explainer, 15-30 seconds for a social cut.
- What tone fits your brand? Calm expert, energetic builder, minimal, or playful.
Keep this brief visible while you work. Every scene, line, and visual either serves it or gets cut.
Step 2: Write a script that sells the next 60 seconds
A clear script with average visuals beats cinematic visuals with a confusing message every time. Use AI as a drafting partner, not a ghostwriter.
Structure the script the way people actually decide:
- Hook (0-5 seconds): State the problem or promise. No logos. No “welcome to Company X.”
- Problem or context (5-20 seconds): Show the pain the viewer feels today.
- Solution (20-50 seconds): Walk through the product workflow. Show, do not tell.
- Proof or payoff (50-75 seconds): A result, testimonial, metric, or before-and-after.
- Call to action (75-90 seconds): One clear next step.
Use this prompt in Claude Code or any writing assistant:
You are a senior product marketer for a B2B SaaS company. Write a 90-second product demo script for [audience] about [product/feature]. The video should open with the problem of [pain], demonstrate [workflow], show the payoff [result], and end with a CTA to [action]. Use plain language, short sentences, and spoken English. Avoid jargon and hype.
The first draft will be too formal and too long. That is normal. Edit it by hand, read it aloud, and cut anything that does not move the viewer toward the CTA. Aim for 130-150 spoken words per minute.
Step 3: Gather source material AI cannot create
AI cannot record your product for you. The quality of your inputs sets the ceiling for the output.
Before you build a scene, collect:
- A stable product environment with realistic demo data.
- A clean browser or desktop: no bookmarks bar, notifications, or distracting tabs.
- High-resolution screenshots of every key screen.
- Screen recordings of the core workflow at 1080p or higher.
- Logo, wordmark, and brand colors in hex values.
- Brand fonts or motion guidelines if you have them.
Record in short segments instead of one long take. It is easier to replace a 10-second clip than to re-record two minutes. Label files by scene number so the agent can place them without guessing.
If your product has animations or transitions, wait for them to finish before moving on. A viewer cannot follow a demo if the UI is still loading while the narration describes the next step.
Step 4: Build a scene-by-scene storyboard
A storyboard maps every beat of the script to a visual and an audio element. Without it, you will narrate one thing and show another, which is the most common demo mistake.
Use a simple table:
| Scene | Time | Narration | Visual | On-screen text | Motion |
|---|---|---|---|---|---|
| 1 | 0-5s | “Approving vendor invoices should not take three days.” | Spreadsheet with overdue rows | “3 days avg.” | Glitch flash |
| 2 | 5-15s | “Here is how this dashboard cuts it to three minutes.” | Product dashboard | “Close in one click” | Clean wipe |
| 3 | 15-30s | “Upload the invoice. The system reads and categorizes it.” | Upload interaction | “Auto-categorized” | Cursor follow |
Feed your script to an AI assistant and ask for a scene breakdown with visual suggestions. Then refine by hand. The storyboard is your production plan. Once it is right, the rest is execution.
Step 5: Record footage that holds up under motion
Even if AI handles the rest, the screen recording anchors the demo. A cluttered or blurry recording makes every effect look cheap.
Follow these rules:
- Use a 16:9 canvas at 1920x1080.
- Hide the dock, bookmarks bar, and notifications.
- Use a neutral or branded desktop background.
- Record mouse movement at normal speed. Do not rush.
- Pause briefly at the end of each action so callouts land cleanly.
- Capture audio separately. Do not narrate while clicking.
Clean footage reduces the amount of correction you need later. It is the difference between a demo that looks produced and one that looks recorded.
Step 6: Produce voiceover that matches the visuals
You have three paths in CoAnimator:
Record your own voice: Use a quiet room and a decent USB microphone. Read in chunks, leave 1-2 seconds of silence between sentences, and record multiple takes.
Generate voiceover with the TTS plugin: Connect an ElevenLabs API key inside CoAnimator. The agent generates narration, places it on the timeline, and times animation beats to the voice. You can regenerate individual lines as the script changes.
Drop in audio you already have: Place your voiceover file on the timeline. The agent analyzes the track and aligns visuals, captions, and transitions to it.
Whichever path you choose, match the voiceover to the visuals at the frame level. If the narration says “then click approve,” the click should happen exactly when the word is spoken.
Step 7: Let the agent build motion and timing
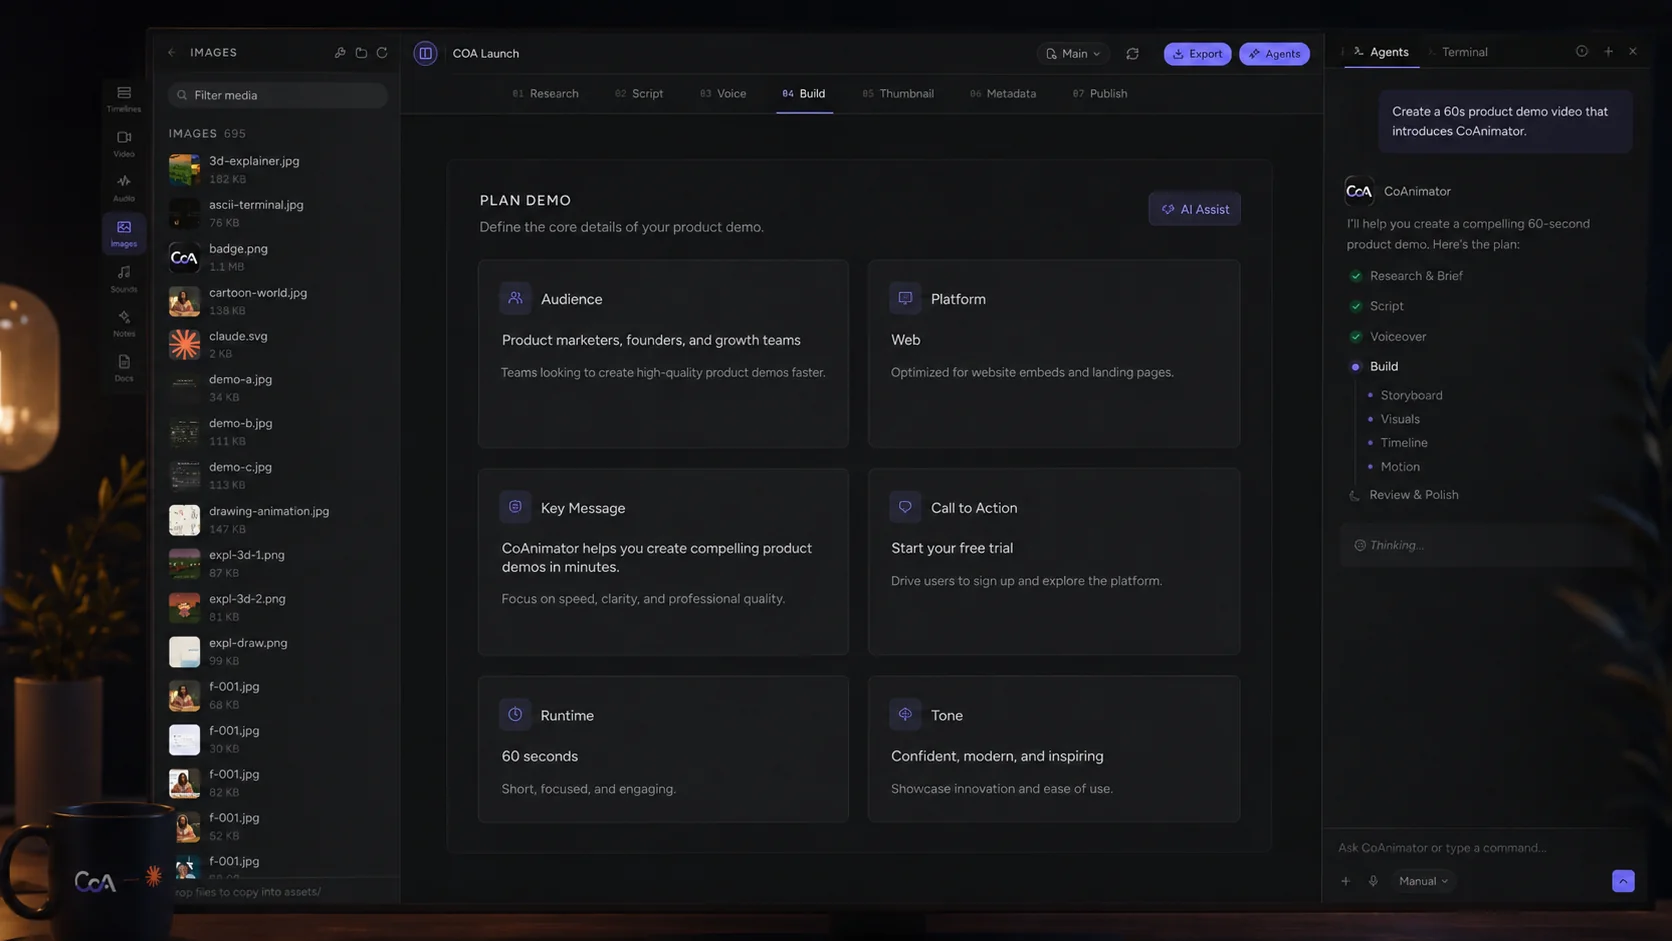
This is where AI saves the most time. In CoAnimator, you describe the look and the agent writes the motion. For example:
Open with a 3-day spreadsheet, then wipe to the dashboard. When I upload the invoice, zoom to the file drop zone and fade in an “auto-categorized” callout. End with a full-screen CTA card in our brand purple.
The agent translates that into scenes, transitions, and timing. It can also generate lower thirds, captions, and background music from your brand kit.
AI motion works best when you give it:
- A clear scene description tied to the storyboard.
- Exact hex colors and font names.
- Precise timing from the script.
- Reference frames to match.
Your judgment still drives the result. The agent handles the mechanical work so you can focus on what matters: the story, the proof, and the CTA.
Step 8: Assemble and tighten the edit
Bring scenes, voiceover, music, and graphics into a timeline. Then prioritize five things:
- Pacing. Cut every pause, filler word, and redundant line.
- Audio levels. Music should sit 12-20 dB below voiceover. Duck it during narration.
- Captions. 80% of social viewers watch without sound. Burn them in.
- Callouts. Highlight clicks, inputs, and results with subtle highlights or arrows.
- Branding. Add logo or end card in the first and last 3 seconds.
Review the edit with the sound off. If the visuals still tell the story, the edit is strong. If it falls apart without audio, add more on-screen text or tighten the visuals.
Step 9: Review before you ship
A demo that ships with the wrong UI or a missing CTA wastes the whole production effort. Run this checklist before export.
Script and messaging:
- The hook addresses the viewer’s pain, not your company history.
- Every claim is specific and defensible.
- There is exactly one CTA.
- Runtime matches the target.
Visuals:
- UI matches the current product.
- No fake data that could confuse prospects.
- Colors and fonts match brand guidelines.
- Logo is used correctly.
Audio:
- Voiceover is clear and matches pacing.
- Music does not compete with voice.
- Captions are accurate.
Compliance:
- No customer logos or data without permission.
- Music and fonts are licensed for the intended use.
- No misleading before-and-after comparisons.
Step 10: Export, publish, and refresh
A single master file is not enough. Export a master and then cut platform variants.
Master export:
- Format: MP4 (H.264)
- Resolution: 1920x1080
- Frame rate: 30 fps
- Bitrate: 8-12 Mbps
Platform variants:
| Channel | Format | Notes |
|---|---|---|
| Homepage / YouTube | 16:9, 1080p or 4K | Keep UI details crisp |
| LinkedIn / X | 16:9 or 1:1 | Add burned captions |
| Instagram Reels / TikTok | 9:16 | Use safe zones for captions and UI |
| Paid social | 9:16 | Front-load the hook |
Once live, measure play rate, average watch time, CTA click rate, and conversion lift. Then refresh on a cadence that matches your product speed:
- Homepage hero: every 3-6 months or after a major UI change.
- Feature explainer: with every feature launch.
- Onboarding tutorial: quarterly review.
- Social cuts: weekly or biweekly depending on volume.
Because CoAnimator keeps the project as plain files, a refresh is a scene swap and a re-render. It is not a new project.
Common mistakes that waste AI video work
Letting AI write the final script. AI drafts are a starting point. The final script needs your product judgment and brand voice. Always edit by hand.
Recording everything in one take. Long takes are hard to edit and easy to mess up. Record in short segments aligned to your storyboard.
Overusing motion. Too many zooms, transitions, and effects distract from the product. Use motion to guide attention, not entertain.
Ignoring captions. Most viewers watch without sound in feeds. Captions are not optional.
Forgetting the CTA. A demo without a clear next step is a movie trailer. Every demo should ask the viewer to do one thing.
Treating the first render as final. Plan for 2-3 review rounds. Even with AI, the first version will need tweaks.
What this workflow looks like inside CoAnimator
CoAnimator is an agentic animation studio. Instead of dragging clips around a timeline, you describe the demo you want and the agent builds it scene by scene on your local machine. You review the live stage, ask for changes in plain language, or edit the underlying project files directly.
A typical CoAnimator project is a folder of plain files:
script.md: narration and timingscenes.json: scene list, asset references, and ordermotion/: animation definitions for each sceneassets/: screen recordings, screenshots, music, voiceovertheme.json: brand colors, fonts, logorender.json: output resolution, frame rate, and format
Because these are plain files, you can version the project with Git, diff changes, and re-render from CI when your product updates. You also get unlimited local renders and no watermark on paid licences.
If you already use Claude Code for video work, the workflow is nearly identical. (Read why CoAnimator was built around this agentic model.) Claude Code edits the same files; CoAnimator renders them.
A demo brief template you can reuse
Paste this into a doc before every demo:
- Goal: [one sentence]
- Audience: [job title and pain]
- Platform: [homepage, social, sales email, etc.]
- Runtime: [target seconds]
- Tone: [calm, energetic, minimal, playful]
- Key screens: [list]
- CTA: [one action]
- Must-include claims: [list]
- Avoid: [list]
- Reference videos: [3 descriptions]
- Brand colors: [hex values]
- Font: [name]
- Voice: [human / AI, gender, accent, pace]
Frequently asked questions
How long should a product demo video be?
A homepage hero should be 60-90 seconds. A feature explainer should be 30-60 seconds. An onboarding tutorial can be 2-3 minutes. A social cut should be 15-30 seconds.
Can I make a demo video with AI and no product footage?
You can, but it usually looks synthetic. The strongest demos show real product screens. Use AI for motion, voice, and editing, not for replacing the product itself.
How do I keep AI-generated demos on brand?
Lock down a brand kit before you start. Give the agent exact hex colors, font names, logo files, and reference videos. Review every scene against a checklist.
What makes an agentic workflow different from a clip generator?
Clip generators hand back a final video file. Agentic workflows hand back an editable project. When the product changes, you update the scene and re-render instead of rebuilding the whole video.
How many revisions should I plan for?
Plan 2-3 rounds for a customer-facing demo. The first round fixes the big issues, the second polishes timing and visuals, the third catches small details.
Should I add music?
Yes, but keep it subtle. Music sets tone and covers silence. It should never compete with the voiceover.
How do I measure if the demo is working?
Track play rate, watch time, CTA clicks, and the downstream conversion you care about. Compare the conversion of the page with the demo against the page without it.
Can I use the same demo for every channel?
No. Cut platform-specific versions. A 16:9 homepage demo will not perform on TikTok without reformatting and re-editing the hook.
Make demos that keep up with your product
The teams that win with video in 2026 do not treat demos as one-time creative expenses. They treat them as marketing infrastructure: a repeatable system that ships at the speed of the product.
If you follow this workflow, you get exactly that. A brief defines the goal. A script controls the message. A storyboard aligns sound and picture. Clean footage, clear voiceover, and purposeful motion carry the viewer through. A sharp review catches the mistakes. Then you export, publish, measure, and refresh.
The difference is not that AI made the video possible. The difference is that the video stays editable, so it never goes stale.